The word Kermesse may mean festival or fair. I decided to use it for this blog, since here I would present a festival of crafts and arts done by myself... and 365 refers to the number of days in a year. The idea started churning in my mind when I came across http://makesomething365.blogspot.com/. The main concept of my blog is to show a piece of art or some craft on a daily basis for 365 days. Some of them I’m well familiar with, while others are completely new. Hope you’ll enjoy this year long journey and feel free to leave any comments.

Monday 28 February 2011

Day 9 Baby felt shoes ready!

As planned, I have continued – and been able to finish – the felt baby shoes. They look ultra funny and ultra cute and was nearly giving up. The beautiful ladies at Prudent baby did a wonderful job with the tutorial and I encourage anyone who is willing to do the shoes to follow their step-by-step guide.

It’s been fun to do and complete this project. It’s been a while since I’ve done some sewing and I think you would have to have some experience. Here are the photos of some of the working and the finished pair.


Oh! And sent the photobook for printing :-)

Take care lovelies x

Sunday 27 February 2011

Day 8 Felt baby shoes pattern

Hello everyone. First of all thank you to those lovely people who are reading these blogs and for your feedback. It means a lot to me!
This freezing morning I scanned some old photos and prepared a photobook to give as a gift. I’m sure it will be a wonderful surprise.
Today I’ll be starting some felt shoes for our son. I found the pattern and instructions here:

www.prudentbaby.com/2010/01/diy-baby-shoes-recycled-from-old-jeans.html

I will not use denim here but green felt, which I bought yesterday along with some tools and other craft material.
You will need:
Pattern
Material
Scissors (one for fabric material, one for paper)
Elastic
Safety pin
Sewing machine
Thread

Print out the pattern and check if it will fit your little baby’s feet (preferably with socks); adjust accordingly. Cut out the pattern. It is useful to fold the fabric in half where you need 2 pieces of the same pattern piece. Pin the pattern to the fabric before cutting out. I left an edge for seam allowance and hopefully for a better fit.


I will continue this tomorrow. I will sew the pieces together and hope to finish it.

Take care always x

Saturday 26 February 2011

Day 7 Envelope print

Hello again and welcome to day 7. It's been a week since I started this and it feels great, I feel great. I got some craft material today gearing up for what's to come. I decided to print the front of an envelope to match yesterday’s card. The postage stamp was done using Paint and you can find the template below.


I worked with MS Word, entered the size of the envelope and added pictures and text as below, and the finished product next to it. Remember to set the printer according to the envelope size :-)


Have a nice day x

Friday 25 February 2011

Day 6 Digital crafts

Super super busy day. Something quick... believe me this is quicker to do than write about. I wasn’t sure what to call today’s craft since it’s entirely done using a computer and printer. The only other thing you’ll need is paper and optionally some embellishments.

The internet is full of ideas for making crafts and one site that I like returning to is: www.hp.com/hho/hp_create/

Here you’ll find ideas for cards, iron-ons, photo borders and games that you can create online and print. Some of them you’ll have to print first and create later! The projects are divided into categories. Browse through till you find what you need.


I chose to create an Anniversary card online and print it.


The instructions are pretty simple to follow and it will help to have at hand the photo you want to add. You also have the space to enter a greeting and searching ‘Anniversary poems’ online surely helps.


You then upload the photo, drag it into the space provided, write the poem (choosing font, font size and colour) and you’re nearly done. Click on preview and print, choose the appropriate settings on your printer and press print.

Once the card is printed fold in half, write the greeting and that’s it. Well if you have a couple more minutes to spare you can decorate the card some more to further personalize it; just try to keep it simple!


Voila’...


Peace & love x

Thursday 24 February 2011

Day 5 Applique

A really cold day... off with today’s craft. It is not a craft in itself but involves adapting a picture to be printed on inkjet transfer paper to be later applied to clothes.

You need:
Picture (or photo; I got mine from the internet and removed some details)
Computer and printer
Inkjet transfer paper
Scissors
Iron
Ordinary paper
Clothing (T-shirt, pillowcase, cushion cover, bag)

Scan or download the picture. Size it according to what you need. Print it on inkjet transfer paper. Remember that the picture is reversed when applied to the clothing, so reverseprinting in mirror mode is required when using text in your pictures.

To apply use a domestic iron of 1200W or more. Preheat the iron and do not use steam. Place the clothing on a hard surface (no ironing board) and place the picture on it face down. Iron the picture for around 3 minutes constantly and evenly. Allow clothing to cool completely before removing backing paper.
Fix the image by placing an ordinary shee of paper over the picture and reironing for around 15 seconds. This will remove the gloss from the picture and provide a flat matt picture on the clothing.

Wash the finished clothing only after 24 hours from fixing the picture, and on the reverse side. Some instructions may vary depending on the manufacturers’ paper. You can decorate the picture further with some embroidery, buttons or sequins. Be careful if you are using the clothing for a baby since small parts may detach. If you know how you can even go around the edges with stitches.

Peace & love x

Wednesday 23 February 2011

Day 4 Drawing

Today I will be doing the libellunina logo to add at the end of the blog. I’ve been meaning to do this and I had thought it would not take me too much time. But it’s finally ready.
The name libellunina comes from 2 words; libellula is the word for dragonfly in Italian. Dragonflies fascinate me. The second part of the word is nina, which is the spanish word for girl and actually was my first username for an email!
I decided to draw the logo on paper, then scan the picture and apply the blog background colour using the Paint program.

You need:
Paper
Pencil
Colours


To get the shape symettrical I find it best to fold the paper in half, draw the first half and then go through the embossed part of the drawing from the other side. This is something I learned way back in the late 1980’s at an art school in Valletta.


I applied various metallic and glittery colours trying to capture the jewel colors of the dragonfly as they appear in the sun. But nature is not so easy to replicate and the sky is the limit in imagination...


Peace and take care x

Tuesday 22 February 2011

Day 3 Tissue paper decoupage

An early rise today, been awaken early since babe’s would not sleep. A nice cup of coffee, plenty of laundry washing and the craft of the day, for which I’m here for. Inspiration comes in all forms of shapes and sizes and material or medium too. I found mine in the paper napkin this morning. Not the white ones but the patterned. I have never tried doing this before though some research on the net shows that it seems quite easy, given you have some crafting knowledge – not much just enough to hold a paintbrush ;-)

You need:
A patterned paper napkin
Acrylic paint
Paintbrush
Jar with water
Mixing palette or saucer
Scissors
Craft glue or decoupage glue
The object to apply the tissue on (I’m using a glass baby food jar but it can be wood, cardboard etc)


Paint the jar with acrylic paint, preferably in a coordinated colour with the tissue pattern. Cut the pattern and do so to one layer of the tissue paper. While the paint is not completely dry apply the pattern to the jar and smoothen out. Dilute some of the craft glue with water and apply all over the picture. Let it dry. Clean the painbrushes with water and dry well. If you want you can finish the jar by applying a layer of matt or gloss varnish or even beads or glitter! You can use these by storing small items in or as a candle holder.


This didn’t turn out well as I expected. I’ll research the technique further and post a new project soon.
Peace and take care x

Monday 21 February 2011

Day 2 Sequin Art

Today’s craft is sequin art. It is simple but can be quite time consuming, depending on the size of the project. It involves sticking sequins – either on pictures or polystyrene shapes – with pins.

You need:
Polystyrene shapes (various, including animals and Christmas figures)
Pins (13mm, short)
Sequins (cup, sparkles)


You begin by passing the pin through the hole in the sequin and push it through the polystyrene shape. You continue doing this and overlapping each sequin as you go along producing a 3D effect. The result is spectacular and shiny, far much better than shown here. You can add aribbon under the sequins before pinning and be able to hang the shape, maybe in a sunny window to produce a myriad of colours :-)


Enjoy & take care x

Sunday 20 February 2011

Day 1 Card-making

Today’s craft is card-making. It is one of my favourites. It is quite simple, quick and effective and gives a full flow of your creative juices as you can apply anything. I like to keep it pretty simple and without too much fuss to keep a clean appearance. Inspiration comes from things and colours around me.

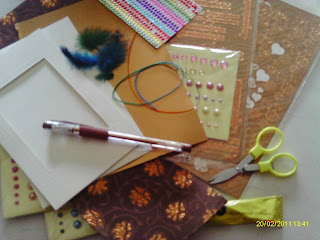
For this project you will be needing:

Paper
Glue or double-sided tape
Scissors
Embellishments
Peel-offs stickers (sentiments)
Card paper (here bought as an aperture card)
Envelope (here included with the aperture card)
Coloured pens

A note on embellishments: these are the items that make the card stand-out. They can be almost anything; 3D stickers, ribbons, feathers, things you do yourself, buttons, dried flowers, small gems and pearls, and other things you might find around your home or work-place. Some are bought for a few cents while others are a bit expensive.


Tweezers come handy when applying the peel-off (Congratulations). This card can be given to someone for graduation, promotion or an achievment reached. You can add the date to make it more personalized and even a name. As you can see it took only about 20 minutes – maybe add 5 more for finishing.


Enjoy and take care :-)